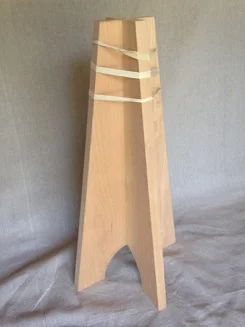
Accent Table - Instructions
How to build an accent Table
Arrow Accent Table Instructions
01. Verify You have the Parts:
1 Top
4 Legs
1 Package of Screws
1 Package of Dowel plugs
3 Rubber bands
Please check to make sure you have all the parts which match this picture.
If you do not, then please contact us at Abbey Bay.
02. Sand All the Parts:
It is easiest to sand the parts individually than to sand them when they are assembled.
An orbital sander makes quick work of this.
03: Dry fit the legs together.
The four legs each have a rabbit joint running down the leg.
Assemble each leg with the next leg to the right of it.
Once the four legs are assembled, take a rubber band and place it around the four legs to hold them together.
Check to make sure the legs are square to each other (90 degrees).
Also, make sure the feet of the four legs are on a flat surface.
04. Glue the Legs Together:
Apply glue down the rabbit joint of each leg.
Assemble each leg with the next leg to the right of it.
Once the four legs are assembled, take a rubber band and place it around the TOP of four legs to hold them together.
Slowly slide the rubber band down the the four legs.
Check to make sure the legs are square to each other (90 degrees) with a square or the small block of work included with the kit.
Also, make sure the feet of the four legs are on a flat surface.
With a damp rag or paper towel, please wipe off any glue that may have seeped from the glue joint.
Let the glue dry over night.
05. Mark the guide lines on the bottom of the top:
The top has four holes pre-drilled in it.
The top is indicate by the 3/8 inch holes, the bottom is indicate by the 1/8 inch holes.
On the bottom, take a ruler and align it across the diagonal of two of the holes.
Make a line once inch long on the out side of each hole.
Repeat this process on the other diagonal so all four holes have a line extending to the out side of the hole.
These four lines will be used to align the leg assembly to be centered on the top.
06. Center the leg assembly on the bottom of the top:
Align the legs to each leg is centered on the lines drawn on the bottom of the top. Each leg should be position so the lines are in the middle of each leg.
With a 1/8 inch drill bit drill a hole from the top into the leg.
With out moving the leg after drilling, insert a second screw into the hole and drive the screw into the leg.
Repeat this process for the other three holes.
Go back and make sure each screw is now tight.
07. Plug the holes in the top:
Apply glue to each of the outside of the plugs and then press the plugs into the holes.
It may be necessary to tap the plug home with a smooth face hammer.
With a damp rag or paper towel, please wipe off any glue that may have squeezed out from the plugs.
Let the glue dry over night.
08. Finish sanding the table.
Sand the plugs flush with the table top.
Be sure to sand the edges of the top of the table.
Sand the edges of each of the four legs.
09. Apply the finish of your choice:
We recommend applying three coats of polyurethane to the table to give it a life long finish.


